Showing posts with label guides. Show all posts

Best website to learn the summary of every Matt Cutts video on SEO out there

Matt Cutts, (bio) the head of the web spam team at Google has provided a number of videos talking about SEO, blogging best practices and answering questions from bloggers worldwide. His videos are not only informative but are very short and precise.


That being said, what if you still want to lessen the time spent - instead of watching all his videos how would you feel if there is a Summarized Solution given for every question asked in the Google Webmaster videos series? Awesome, right? That's how even I felt when I came across this website which is aptly named as:-

The Short Cutts. The Short Answers to every Matt Cutts Video


This website provides a simple, sweet, precise answer to all the questions asked to Matt Cutts by humans worldwide. The website is a simple one which you'll definitely find useful, if you are a regular follower of the Google Webmaster Videos YouTube Channel.


The website also offers four guides as freely downloadable after we sign up on their contact form page. Though, I wouldn't sign up unless I really want to read their guides - they are useful but I chose I would pass them for the time-being and revisit them later.

One funny feature about the website is that they provide different colored T-Shirt pictures which when clicked filters the webmaster videos that has Matt Cutts wearing that colored T-Shirt which was clicked!


Give it a try and please let me know your comments below if you found this useful.

Written by Arun Sarathy

10 Great Videos To Supercharge Your Blog Or Website - Google Webmaster Videos

These videos are a part of the Google Webmaster series posted on YouTube. I have collected them and posted here in a single place so anyone who wants to learn a few basics and few advanced topics on SEO and Blogging can be benefited.


These are given in no specific order. However, the #1 rank is aptly given, at least IMHO.

10. 5 Common Mistakes in SEO (and 6 good ideas!)

9. What are some effective techniques for building links?

8. How can I make sure that Google knows my content is original?

7. What are the top 3-5 SEO areas where webmasters make the most mistakes?

6. What is the best way to check your own site for keyword rankings?

5. How important is it to have keywords in a domain name?

4. What are some examples of SEO misinformation?

3. How would a non-optimized site outrank a site which has done SEO?

2. SEO for startups in under 10 minutes

1. How Search Works


This is definitely not a complete list. These are just the 10 videos that I felt truly great. These helped me learn the basics of SEO and blogging. For more videos like these - subscribe to Google Webmasters Group.


Related: Get the summary of all Matt Cutts videos

--------------------------------------------
Posted by +Arun Sarathy

How to keep the paragraph settings as default in Microsoft Word

When typing in a word document you may notice that by default the line spacing is either 1.5 lines or 2 which is quite irritating while editing a normal, personal word document - nothing official.


Word line spacing defaults - thekeyponderer.blogspot.com


When we navigate to the Home > Paragraph > Spacing section - you can see that the 'After' field is 10pt by default. You will have to change it to '0' (zero) so the spacing is minimal. But this setting has to be made everytime.


So how to make this setting with zero line spacing as default?


In the same window, there is button that reads 'Default...'. Just click on it to make your current changed settings as default. That's it!

To change this default to normal or any other setting - simply make your changes and click on 'Default...' button again to keep the new settings as your default.

Note that this change only works for the current document. If you open a new document, then the changed settings won't apply.

Please do write your comments below if you liked this post. Thank you!

Written by 

Facebook Keyboard Shortcuts - Most Essential Cheat Sheet For Facebook Addicts

Facebook as a sharing platform has accomplished its goal. No doubt. Its niche is constantly evolving with new updates from every corner of the world. Overnight, any individual over 13 years of age and any business can create a tiny website for themselves by way of a profile or a page, respectively.

facebook keyboard shortcuts - thekeyponderer.blogspot.com

Facebook in its entirety being useful or not, is not the case of concern. But few keyboard shortcuts are certainly useful to save some time when using Facebook.
This is really funny here because there are some organizations that scream at their employees of low productivity and wasting time in Facebook. And here we are talking about saving time while using Facebook – however funny it might be, it certainly is true when you use keyboard shortcuts to get some things done within facebook.

With these keyboard shortcuts you can essentially speed up your pace at which you update your status, timelines, profile, check your friend requests, etc.

Keyboard and Browser types

If the computer you use doesn't have a numerical keyboard – a separate num keypad, then the keys you press should be used by hitting the 'shift' key when pressing shortcuts that have numbers in it. When you use Internet Explorer, with every key press, hit the Enter key for shortcut to work. It's that simple! (Pun intended).

Facebook essentials: Keyboard Shortcuts


Facebook keyboard shortcuts thekeyponderer.blogspot.com
Source: Social bakers


Have any questions, thoughts or comments to share? Please express them below in the comments box. 

Written by 


Advertisement: Related books


Access Keys - Keyboard Shortcuts for Facebook Users with Disabilities

Facebook, since its founding on February 4, 2004 has grown to an extent even its founder has not dreamed of when it was started. Today any person can create their own Facebook profile for free, only catch being aged 13 or more.


Since Facebook has earned so many followers from all age groups, genders, nationalities, diversification, people from all walks of life should have access to it - regardless of their differences. In facebook's noteworthy addition - it has added accessibility features for people with disabilities.

Keyboard shortcuts for people with disabilities - thekeyponderer.blogspot.com


Variations - intended recipients

For people with disabilities, Facebook has added options to navigate it with keyboard shortcuts. This works with any type - PC wireless keyboards, mac wireless keyboards, or any general desktop ergonomic keyboards like the Microsoft Wireless Keyboard 3000. However, to make the best use of this article, one should definitely know how to control the computer without a mouse using the computer arrow keys in general. 

For other general keyboard shortcuts, read this post –

Known as Access keys, these are for keyboard-only users. The shortcuts provided by facebook are given as browser-specific for all major browsers like Google Chrome, Mozilla Firefox, Apple's Safari and Microsoft's Internet Explorer.

The following are the access keys (keyboard shortcuts):


  • Internet Explorer for PC: Alt + #, then Enter
  • Firefox for PC: Shift + Alt + #
  • Safari for Mac: Ctrl + Opt + #
  • Firefox for Mac: Ctrl + Opt + #
  • Chrome for Mac: Ctrl + Opt + #
  • Chrome for PC: Alt + # 

Access Keys

  • 0 - Help
  • 1 - Home
  • 2 - Timeline
  • 3 - Friends
  • 4 - Inbox
  • 5 – Notifications
  • 6 – Account Settings
  • 7 - Privacy
  • 8 - About
  • 9 - Terms
  • m - New Message 

Keyboard Shortcuts

  • c - Comment when on a story in News Feed
  • j and k - Scroll between News Feed stories
  • l - like or unlike a selected story
  • q - search for a friend to chat with
  • p - Focus on the text box when making a post
  • / - Search 

Web Messenger

  • CTRL + g - Search conversations
  • CTRL + q - Show/hide keyboard shortcuts
  • CTRL + Delete - Archive/unarchive conversation
  • CTRL + j - Mark as spam
  • CTRL + c - Start a new message
  • CTRL + i - Go to Inbox
  • CTRL + u - Go to Other

Have any questions, thoughts or comments to share? Please express them below in the comments box. 

Written by 


Advertisement: Related books


Gmail update: Reach more people you know

Here is a cool update from the Gmail team early this year (2014).

What this update means to you?
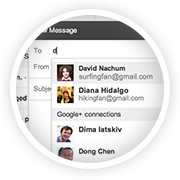
If you want to send an email to people who haven't yet exchanged the email addresses with you, then this feature might come in handy. But for this to work, what Gmail does is just suggest your Google+ connections as probably recipients when you type in the first few letters of your intended recipients. For this to work, you need not even add the email addresses to your contacts - it shows up as they are already in your Google+ contacts.


These preferences are handled and changed on your settings page. Read the newsletter I received below for more details.


Gmail update: Reach more people you know
Ever wanted to email someone you know, but haven't yet exchanged email addresses? Starting this week, when you're composing a new email, Gmail will suggest your Google+ connections as recipients, even if you haven't exchanged email addresses yet.
How it works with email addresses
Emailing Google+ connections works a bit differently to protect the privacy of email addresses. Your email address isn't visible to your Google+ connections until you send them an email, and their email addresses are not visible to you until they respond.
Receiving email from people outside your circles
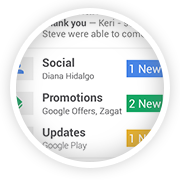
If you receive an email from someone outside your circles, it will be filtered into the Social category of the inbox (if enabled) and only after you respond or add them to your circles, can they start another conversation with you.
How to control who can contact you
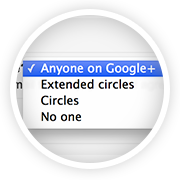
You're in control of whether people can reach you with a new setting in Gmail on the desktop. To learn more, check out the Help Center.

The Gmail Team


Quick Tech Trick # 7: How to show two time zones in your MS Outlook?

Category: Windows | Outlook | Productivity

Some of us have clients or friends outside our home country, who may live in a different time zone. Planning a meeting or an appointment which should suit best for both could be a challenge in such a situation. That's when a feature in Microsoft Outlook's Calendar comes in handy. Just follow these steps:


Tools > Options > Calendar Options > Time Zones > Check the box to show and 'Additional Time Zone'.


(Alternatively, you may also simply right click on the area where time is shown within your Calendar and choose 'Change Time Zone').


Choose your required time zone > hit 'OK'. Now you will have two time zones shown in Outlook!


Posted by 


How to keep a watch on your Google AdSense revenue regularly?

Category: Blogging | Utilities

First, ensure you are using Google Chrome. Trust me, it gets better with this browser. Then install the Google Publisher Toolbar, an extension from the Google Web Store.


Now you get the point. Just click on the Google Publisher Toolbar once and it shows you:

  • that day's estimated revenue, 
  • the previous day's earnings, 
  • this month's accumulated earnings and 
  • the previous month's earnings.

It also shows the Top 5 Channels/URL Channels for today, yesterday, this week, this month and last month.


I don't know why it's called as a 'toolbar', but it does the job, well!


Quick Tech Trick # 5: How to give a URL in blog comments - Wordpress, Blogger

Category: Blogging | Commenting

How do you provide a URL in the comments section of a blog?

Wordpress or Blogger - be it anywhere. You might want to provide a URL without providing the visible "https" section.
For eg. a hyperlink like this one - How to sort and filter emails in Gmail by size and more.


Here's how:

Write the other parts of your comment as usual. And whenever you want to provide a link to a word or a sentence, just use the <a> tag with the 'href' attribute as given in this format:

<a href="http://thekeyponderer.blogspot.com/">The Key Ponderer </a> 

That's it! Now you'll see the text with your URL in it.


Written by .

How to apply for Voters’ ID card online (India)?

It is every citizen’s responsibility to vote. Even if one is not interested to vote, options are there to go to the ballot and press a button that conveys your no-interest in voting. However, it’s our collectively taken decisions during these elections which decides who would be our leaders. 

Thus, every eligible citizen must vote. How does one register/enroll for this? Keep reading...


Image courtesy of Taoty / freedigitalphotos.net


Which form should I use for my application?


The answer to this question depends on your requirement. Given below are the different form numbers and their purposes.


How do I apply online now?

This is known as e-registration. Various ECI State specific websites have their e-registrations available on their websites. You just have to input some details which would then be translated in that particular State’s local language. Don’t worry, translation is automated with just a click of a button provided along with the e-registration form - named as ‘Translate’.

If you reside in Andhra Pradesh, apply online through 'e-registration' menu given in Andhra Pradesh’s e-registration website.

To know your State specific link check here: http://eci.nic.in/eci_main1/Links.aspx

What are the photo specifications?
The photo should be uploaded using the browse option. Only .jpg images are allowed and image size must be less than 100 KB. Width and height must be 240 X 320.

It’s prudent to remember that mere registering of one’s name for obtaining a voter’s id card and mere possession of a voter’s id card doesn’t guarantee that you are an elector. One must also be included in the Electoral Rolls to vote their choice of Netas. So how do we know our names are included in the Electoral Roll?

How do I know if i am included in an Electoral Roll?
To check if one’s name is included in Electoral roll, we have to check in the list for our respective State - District - Assembly Constituency list using our Voters’ ID Card No. and Name and Address. Using this information, we can find out if our name is included in the Electoral Roll.
This link will help you do just that: http://eci.nic.in/eci_main1/Linkto_electo_search.aspx


What about NRIs?
NRI voters. NRI voters can fill up Form 6A for inclusion of their names. However, one must note that there is no provision for any e-voting, voting by post or email or voting at an Indian Mission or embassy abroad. For more info on NRI electors, please go here http://eci-citizenservices.nic.in/frmForm6ANew.aspx


Bonus Information:
Election Commission of India website http://eci.nic.in/eci/eci.html
Name, email address, phone, fax, intercom numbers and residence phone numbers of different officers are given in this link.


Lodging complaints:

http://eci-citizenservices.nic.in/ also provides a way to lodge your complaints. the site asks if you are a citizen or an officer first, then you’ll have to register there first before lodging a complaint.

Happy Voting!

Written by .